
Project management is often about optimizing workflows and increasing productivity. So that you have more time for important things.
Surely you know this: In many project teams there is always one or the other:
- who somehow doesn’t get anywhere.
- who never has enough time to complete his tasks.
- who doesn’t really know if or what he’s supposed to do.
- who forgets tasks again and again.
- who doesn’t (yet) find his way around.
There are numerous ways to make everyday project life easier for such employees (and themselves). Today we introduce one of them: the use of counter boxes of the Redmine Reporting Plugins based on the Getting Things Done method.
Definition of Getting Things Done: David Allen’s Getting Things Done (GTD) principle is a simple self-management method. Its core are five pillars (1. capture, 2. clarify, 3. organize, 4. reflect, 5. engage), which should help to create space in the head. By recording tasks accordingly, organizing them and thus working them off in a structured way.
get things done
Used correctly, the counter boxes help your team to optimize their daily work flow. They show, for example, what to do and where to go. And that’s how it works.
What you need
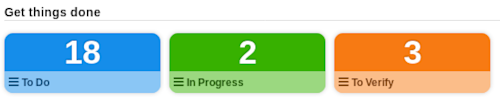
In order for the GTD method to work optimally in Redmine and for you to get something like the following screenshot you need:
- a Redmine installation
- custom queries for your tasks
- a Redmine Reporting plugin installation
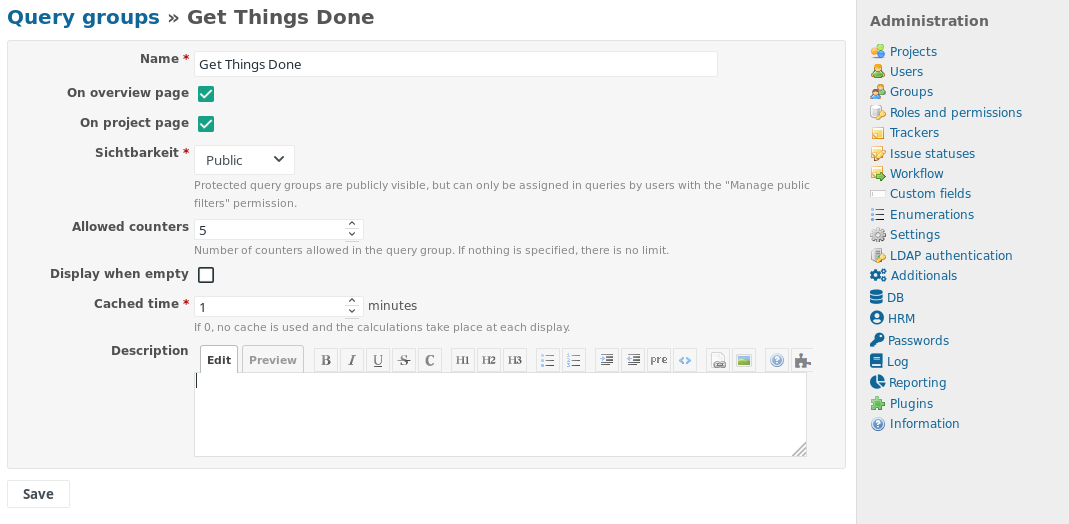
- a counter box to store all your counters (e.g. Get Things Done). Those counter boxes must be added by a user with administration rights in the plugin configuration Administration / Reporting / Counter groups.
Let’s get started.
1. Capture
All tasks that a project team has to do have to be recorded in Redmine. As you know, this works very well by creating issues (tickets). So create all tasks in Redmine issues. Assign a team member (Assigned to). If possible, enter a time estimate and fill in all necessary fields accordingly.
2. Clarify
Make sure that the task is described so that the employee knows what to do. If not, there is a need for clarification. The tasks should then be re-edited accordingly.
3. Organize
Tasks can be sorted according to various criteria. Priorities, dates, time estimates, status information, user, issue ID, categories, etc. can be used to sort tasks. Once you have decided what your team needs, you can create user-defined custom issue lists (task lists) for sorting.
Adding an issue list:
Anyone who is already using Redmine in project management knows for sure that you can adapt the issue list to your information needs using filters and also save it for later than as a custom query. This option is usually available to any normal user. But not everyone is familiar with the filter options.
Therefore it makes sense that project managers, for example, simply specify task lists and make them available to their team members. This already works very well with Redmine by default. Based on the GTD method, the following issue query lists, have proven their worth in our projects for example:
- ToDo. Open issues (Status = ToDo, New, etc.) that I (Assignee = «me») have to do. The options help you to display all necessary columns, to sort the tasks (e.g. according to priority, date, project etc.)
- In Progress. Open issues (Status = In Progress etc.) that I (Assignee = «me») am just working on (which means, that I must be actually work on it right now).
- To Verify. Open issues (Status = To Verify etc.) which are assigned to me (Assignee = «me») because things requiree my feedback or must be tested or closed etc.
Activating counter boxes:
From here on, the reporting functionality is used. If all relevant custom queies on issues exist, you activate the counter boxes of the reporting plugin. This is how it works:
- You can already activate the counter boxes when you create a custom query of your issues. Or later via the “Edit” link of the already existing custom query.
- To do this, open the “Counter boxes” section at the bottom of the page and complete the fields.
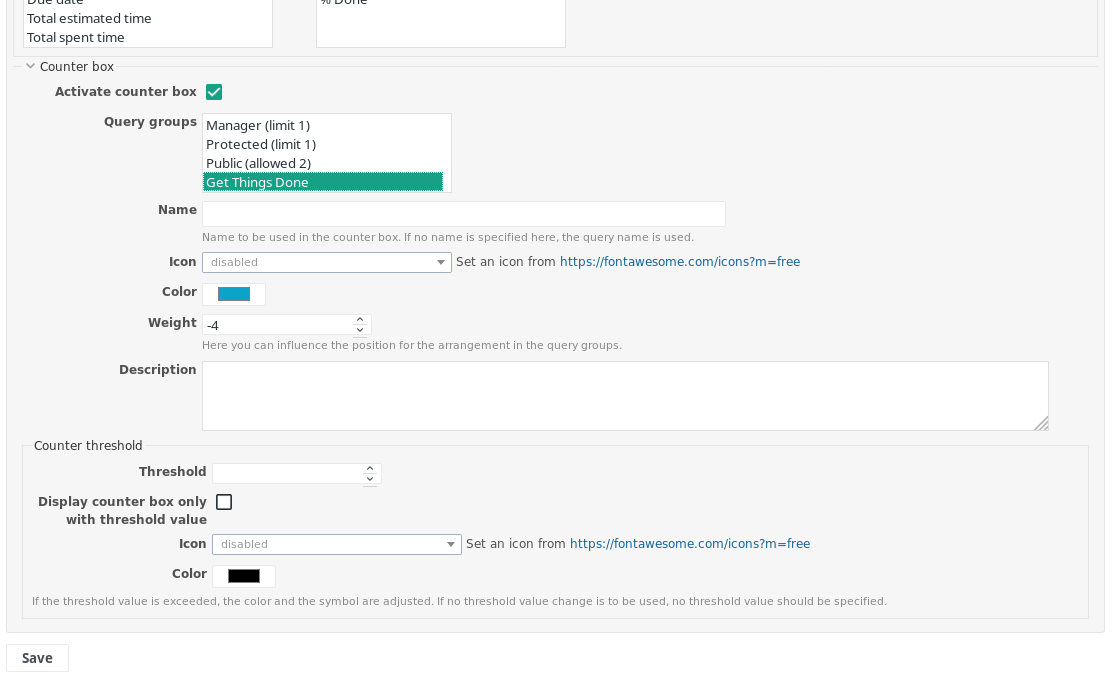
- It is important to activate and assign the appropriate Query group and to specify the Weight in order to influence the display order within the group.
- The other specifications are optional. It is possible to work with so-called Threshold. This can be used to control whether a box is displayed immediately or only when a certain value defined as a “trigger” has been reached (e.g. date of delivery exceeded). More about this in another article.
- Also work with colors and icons. Especially if you have many creative users in your team.
- When you hit Save the activated counter box is displayed to the authorized users according to the visibility specification made by the administrator. Either on the Redmine start page or the project overview or on both.
Counter boxes that refer to custom queries for issues are displayed to all users whose assigned to a Redmine role that has at least the right to view issues and therefore has (reading) access to the issue list.
4. Reflect (check on it)
You as the project manager have now created the necessary counter boxes for your team. They should now be displayed at the corresponding position in Redmine.
Now it’s up to your users to use them. Make them aware of it and briefly explain the principle to them. The boxes display numbers that show how many items are behind them. One look and the user sees what is expected of him or what needs to be done. A click on the link in the box takes the Redmine user to the corresponding list of his / her tasks.
5. Engage
The counter boxes help you to approach your project work in a more structured way. In a way, they take you to the appropriate areas of Redmine that are relevant to your work. They visually show what needs to be done or what is expected of you. Try to achieve a certain routine with the boxes and their processing. Because for the completion of the tasks you are still alone responsible.
So as a user you should:
- regularly check what to do and take the next step.
- Change the status of the issues you are actually working on accordingly (e.g. set to “In Progress”).
- react to issues that expect a reaction from you (e.g. everything in the box “To Verify”)
Summary
We personally love working with the counter boxes. The function is one of the first of the Reporting Plugin. It has been improved over time. With the new plugin version planned for February 2019, not only the GTD method described here can be used, but for the first time it is now possible for every user to create his own counter boxes via the custom queries for himself. As well as in addition to issue queries also counters to query lists from other areas / installed plugins (e.g. contacts, DB entries, password lists, attendance entries, project reports, time recordings, user lists etc.).
Further application examples
Here are a few inspirations of what you can do if you have installed additional plugins (HRM, DB, Passwords, Contacts). In the future, use the counter boxes of the Reporting Plugin to be informed:
- when a certain number of issues has been reached or exceeded
- as soon as tasks wait for your feedback
- as soon as new issues have been created in a specific project
- which of your team members are currently absent (HRM)
- who from your team will have a Birthday soon (HRM)
- In which projects there were exceedances, e.g. the total budget was exceeded, tickets due were exceeded or time spent was exceeded (reporting)
- which logbook entries should be checked by you based on certain criteria (Reporting)
- which user accounts can never be activated (and thus deleted) (HRM)
- which passwords are not secure enough (passwords)
- which DB entries with expiration dates should be checked soon (DB)
- and much more…
If you don’t know the Open Source Tool Redmine yet, you can have a look at the features of the newest version and our add-ons in the Online-Demo on this website. Or take a look at our online Webinars on Redmine and the use of plugins. If you are interested or have further questions, please do not hesitate to contact our support. Just leave us a message.