
Checklists are useful whenever small pieces of work belong to an issue. They are a good fit when
- a separate issue would be too big for it, or when certain parts of an issue are worked through step by step.
- issue descriptions become hard to read, several people are involved and their tasks should stand out.
- one person wants to define the individual steps because the work recurs.
Subtasks would be the better way in an ideal world, but checklists are simply more practical at times, because items can be ticked off visually.
That is what our plugin is for: Redmine Issue Checklists. It brings checklists straight into the issue. A to-do list inside the issue, quickly created, easy to edit and done with one click.
The plugin runs on its own. You do not need any other plugin from us. If you already work with our other plugins, additional functions become available. This is how it works:
Checklists in Redmine issues
Every issue can hold a checklist with any number of items. A progress bar shows how many of them are done. Sections can be inserted and help to structure larger packages of work.
The work happens in the issue view: add items, tick them off, reorder them by drag and drop.
Who may do what is defined through roles and permissions. The plugin comes with four separate permissions:
- view checklists
- tick off checklist items
- edit checklists, meaning create, change, delete and reorder items
- manage checklist templates
A team member can therefore tick off items without being able to rebuild the list.
When the same steps come up every time
Quality checks, release processes, onboarding: a lot of work repeats itself. Checklists can therefore be created as a template, globally or per project, and applied to new issues automatically.
If you also work with our Templates Plugin, a checklist can be attached to an issue template. It then appears on the new issue right away.
Why the combination with the Templates Plugin makes sense
An issue template defines the fields of an issue: tracker, subject, description, assignment and custom fields. It does not contain the working steps. If you attach the checklist to the template, one click creates the issue including its working steps.
That gives you three advantages:
- You maintain the workflow in one place. If something changes, you change the template. A second checklist template does not need to be adjusted.
- Placeholders in the items are resolved. When the template is applied, the same substitution applies to the checklist as to the rest of the template text. An item can refer to the project or the user and appears filled in on the issue.
- Sections are carried over. Templates use the same notation for sections as the checklists plugin. The structure stays unchanged.
Changes to the checklist of a template are recorded in the template history. You can see when someone added or removed an item.
When an issue gets closed while something is still open
That is what the close protection is for. It is optional. When it is active, an issue can only be closed once all items have been ticked off.
This is useful above all where a process has to be verifiably complete. The system then enforces the process and the manual check is no longer needed. Without the close protection the alternative is a look into the issue, and experience shows that this does not always happen.
An overview without opening every issue
The status of a checklist can also be seen outside the issue:
- issue queries can be filtered by checklist status
- the progress can be shown as a separate column
- the next open item is ticked off straight from the issue list
- checklists appear on the cards of the taskboard, which requires the Reporting Plugin
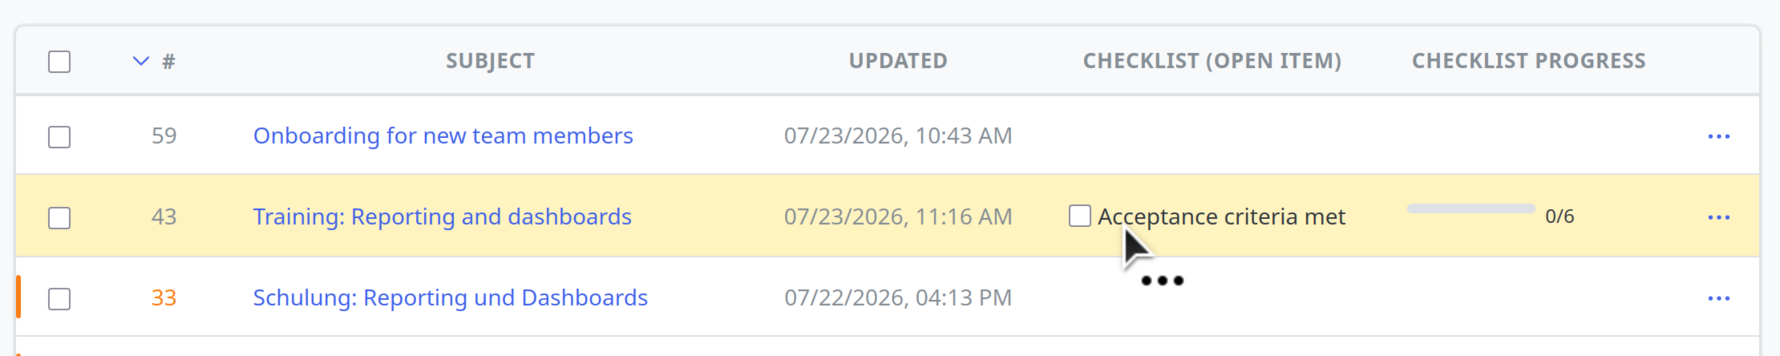
All changes to a checklist are recorded automatically in the issue journal. Who ticked off what and when therefore stays traceable.
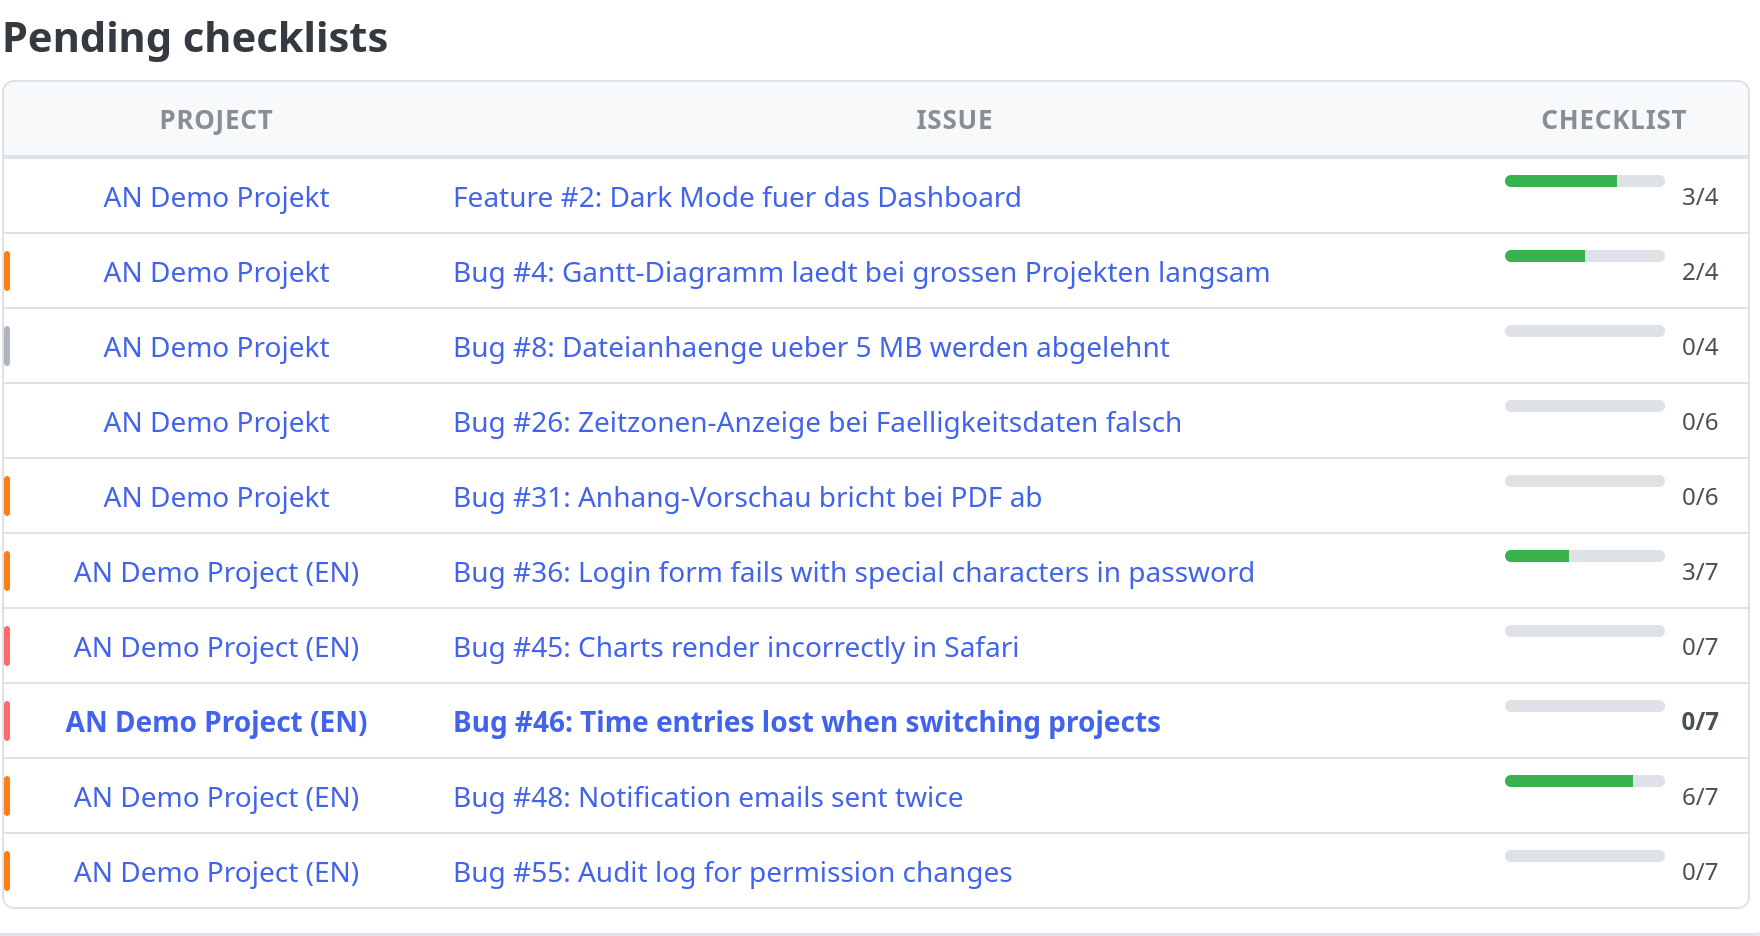
All open checklists in one place
The dashboard block collects the open checklists across project boundaries. You see the project, the issue and the progress, and you tick off items right there.
Working together with our other plugins
The following functions become available if you use further plugins of ours. None of them is required.
The Automation Plugin maintains checklists by rule. It adds items on save or on a schedule, replaces or removes them.
The AI Plugin evaluates checklists and suggests items when an issue is created.
None of this is mandatory. The checklists plugin also runs on its own. In combination with the Templates Plugin it makes particular sense.
The plugin is available on its own or together with the Templates Plugin as the Checklists + Templates bundle. You can try it in our online demo for Redmine 7. The current terms are on our pricing page. Customers in our Managed Hosting get it as part of the Planning Add-On, bookable monthly, or through Redmine Enterprise Support.
All functions at a glance: Redmine Issue Checklists Plugin.