
Managing test cases directly inside Redmine, without an additional tool or a separate login, that is one of the possible use cases for the DB Plugin. It is not a purpose-built test case management (TCM) platform, but it is flexible enough to serve as one for teams whose testing process is tightly connected to their issue workflow.
Instead of creating one Redmine issue per test case, which quickly becomes difficult to manage at scale, you store test cases as structured DB entries with their own fields, statuses, tags, and direct links to issues. The result is a searchable, filterable test case library that lives right alongside your regular Redmine work.
How DB Plugin Concepts Map to Test Case Management
Before diving into the setup steps, it helps to understand how the plugin’s general concepts translate into a testing context:
| DB Plugin concept | Test case meaning |
|---|---|
| DB Type | A test suite or category (e.g. Functional Tests, API Tests, Regression Suite) |
| DB Entry | A single test case |
| Status | Reflects the current test result: pass, pending review, or fail |
| Custom Fields | Structured metadata - preconditions, test steps, expected result, priority, etc. |
| Issue relation | Traceability link between a test case and the bug or feature it covers |
| Tag | Cross-cutting label for sprint, area, or automation status |
| Query | A saved filter view - your standing reports and test queues |
Step 1: Define Your Test Suites
Start by thinking about how your test cases are grouped. A good rule of thumb is one DB type per test suite or category - for example, functional tests, API tests, regression suites, and performance tests. Each type can have its own set of custom fields, icons, and colors to make navigation easier at a glance.
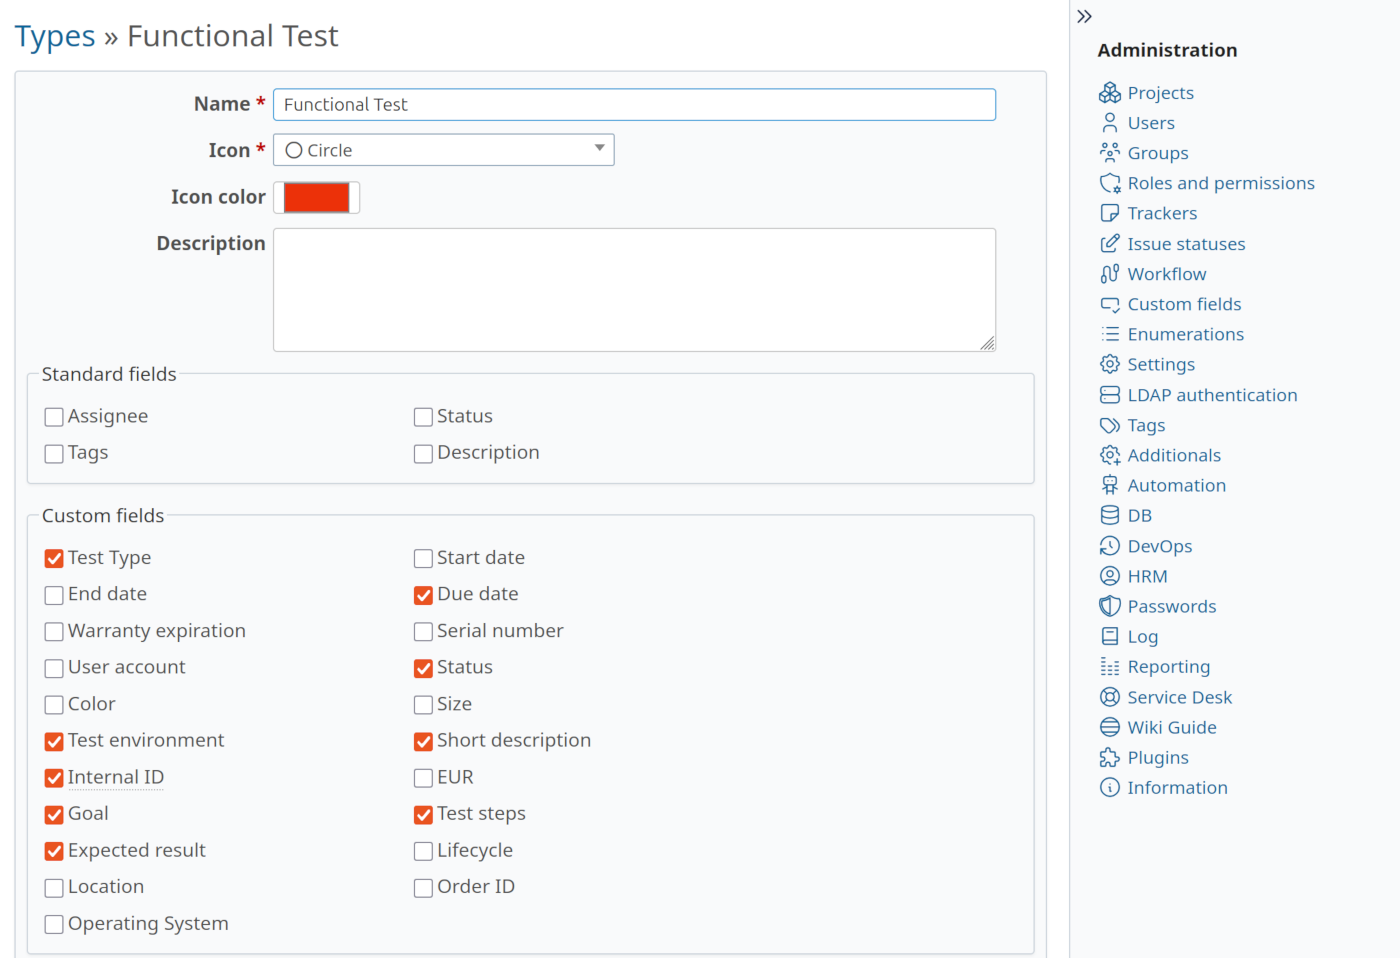
Step 2: Design Custom Fields for Each Suite
Decide which structured information each type of test case needs. Common fields include preconditions, numbered test steps, expected results, the component under test, priority, environment, and whether the test is automated.
The key advantage over Redmine issues: each DB type can have its own independent field set. An API test suite can have an endpoint field, while a UI suite has a browser field, without any overlap or clutter between them. Custom fields are also filterable, so you can later build queries like “all critical manual tests” directly from these values.
Step 3: Activate the Module in Your Project
Once the DB types and fields are defined globally, enable the DB module for each project where you want to manage test cases. As part of this step, choose which of the available DB types are relevant for that particular project.
Step 4: Create Your Test Cases
With the structure in place, you can start adding test cases as DB entries. Each entry has a name, a type, a status, an assignee, tags, a description, and whatever custom fields you defined for that type.
A few things are worth settling before you create entries in bulk:
- Agree on a naming convention. Entry names must be unique within a project (the system enforces this). Using a consistent prefix per suite (e.g.
[AUTH]orTC-001) prevents naming collisions and keeps the list view clean. - Use custom fields for structured content. Steps, expected results, and other filterable data belong in custom fields - not in the description.
- Link test cases to issues. Use the related issues section to connect each test case to the bug report, user story, or feature request it covers. This gives you bidirectional traceability: from a failing issue you can navigate directly to the test case, and vice versa.
Step 5: Organize with Tags and Saved Queries
Tags let you slice across DB types and suite boundaries. Use them for cross-cutting concerns like sprint scope, release milestone, or area (e.g. smoke, auth, sprint-42). The sidebar makes it easy to filter with a single click.
Saved queries are equally important. Build filter views for standing needs - all currently failing tests, the smoke suite, your personal review queue and save them so the whole team has immediate access. These become your working test-run views.
Step 6: Track Test Execution with Status
The three built-in statuses (valid, to verify, invalid) map naturally to a test-run cycle: a newly created test case starts as to verify, moves to valid after a successful execution, and shifts to invalid when it fails. When a related bug is fixed, reset the status back to to verify so the test gets re-executed before it is cleared.
This is not a full test-run history, only the current status is stored, but for many teams it is sufficient to answer the most important question: which tests are passing right now and which are not.
Step 7: Import Existing Test Cases
If you are migrating from a spreadsheet or another tool, you do not need to re-enter everything manually. The DB Plugin includes a CSV importer that maps columns to entry fields and custom fields, making bulk import straightforward.
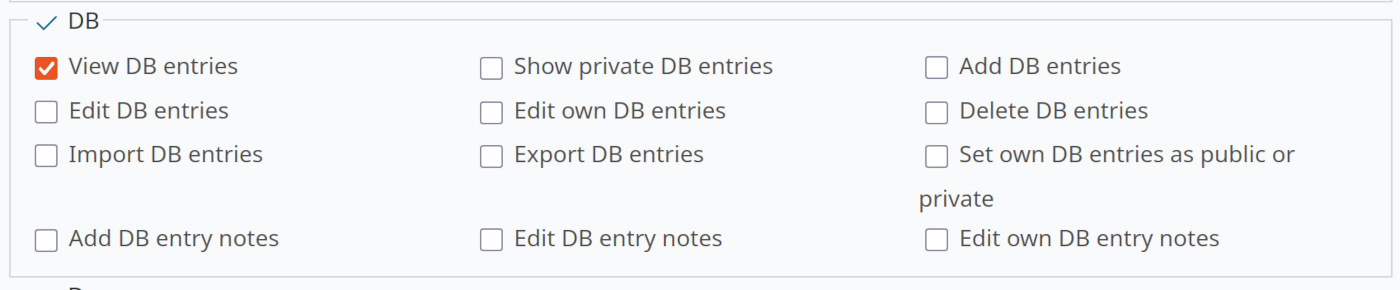
Step 8: Configure Permissions per Role
Define which Redmine roles can view, create, edit, delete, import, and export DB entries. A typical setup gives QA engineers write access, developers read and comment access, and project managers or QA leads access to import, export, and delete. Fine-grained permissions ensure that the right people can do the right things without opening everything up globally.
Tips and Best Practices
- One test case per entry. Keep each entry atomic and independently executable.
- Put structured content in custom fields, not in the description. Custom fields are filterable and queryable; free text in the description is not.
- Use the copy function to duplicate a similar test case and adjust it, rather than writing from scratch.
- Save named queries for standing reports: Failing Critical Tests, Smoke Suite, My Review Queue - these appear in the sidebar for quick access.
- Link every failing test to an issue. The relation is bidirectional - developers see which test cases are affected when reading a bug report.
- Use private entries for draft test cases that are not yet ready for the team to see.
When Does This Approach Make Sense?
The DB Plugin is a good fit when your testing process is already closely tied to Redmine, when you primarily need an organized and searchable small test case library linked to issues, and when you do not need detailed execution history or metrics dashboards.
It is not a replacement for dedicated TCM platforms like TestRail, Zephyr, or Xray. Those tools offer structured test runs with pass/fail history per execution, per-step tracking, CI/CD result ingestion, and coverage charts. If your process depends on those features, you will feel the limits of the DB Plugin quickly.
| Your primary need | Recommendation |
|---|---|
| Searchable test case library linked to Redmine issues | DB Plugin is a good fit |
| Simple pass/fail tracking per release with tags | DB Plugin works |
| Historical execution records across multiple test runs | Consider a dedicated TCM tool |
| Per-step execution tracking during test runs | Consider a dedicated TCM tool |
| Automated CI/CD result ingestion | Consider a dedicated TCM tool |
| Trend charts and coverage dashboards for stakeholders | Consider a dedicated TCM tool |
The DB Plugin is a pragmatic choice for small to mid-sized teams that already live in Redmine, are getting started with structured test management, and want everything in one place - without an extra tool, an extra login, or an extra budget.
The feature presented here is part of the DB Plugin. The DB Plugin is available individually or as part of the Enterprise Bundle and can also be used as part of our Redmine hosting offer. Information about our Managed Application Hosting for Redmine can be found here on the website.