
Redmine is the center of many project teams with its diverse functions such as issue management, wiki or file management. Properly configured, the software from the open source area not only supports your team in the processing of their tasks. But it also allows your customers an insight into your activities. Or access to relevant data without interfering with your workflow.
In our tutorial you will learn how to use public projects to provide your customers (which do have a Redmine login as well) with information or read access to tickets. You will need:
- A Managed Redmine application hosted by AlphaNodes or an equivalent custom installation.
- The description is based on the current Redmine version 5.0.x
- and the freely available additionals Plugin on GitHub (for Redmine Dashboard support)
Create a public Redmine project
Step 1: Preparatory measures
The aim of the tutorial is to:
- Create a public Redmine project for Redmine users (e.g. clients).
- These users get read access to the project content (issues, wiki pages).
- These users are allowed to download files.
- These users are not allowed to comment, change or delete content.
Required prerequisites must be:
- the configuration is carried out by a user with administrator permission.
- the configurator is allowed to revise the necessary role permissions for non-members.
- the public project is in a Redmine system that requires login authentication.
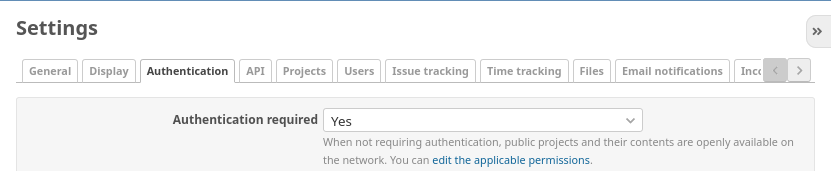
This setting is important to prevent external visitors (anonymous) from accessing publicly marked projects in your Redmine.
Limitations of this option:
- Non-members see the content to which they have view permissions.
- Non-members can see the members of the project who are responsible for creating the content in the project.
- Non-members can see the status of an issue and the communication that takes place in it between the issue stakeholders (author, assigned to, commenter, etc.), but they cannot be assigned to an issue.
The goal is that the role non-member should not see anything from the other users of the same role. Therefore, this is an acceptable side effect.
Step 2: Revising the “Non-member” role
Redmine has some system roles that are only usable for certain application purposes and cannot be deleted. One of these roles is the “Non-member” role. This is usually a registered user, but not assigned as a member to a specific project.
For our use case, the Non-Member role is ideal. This is because it can be used for public projects without having to assign members to that project. Since the users have read-only access (i.e., are not actively involved in the content), they don’t learn about the other users of the same role. This is handy for projects that manage / provide general content that any Redmine user has access to anyway.
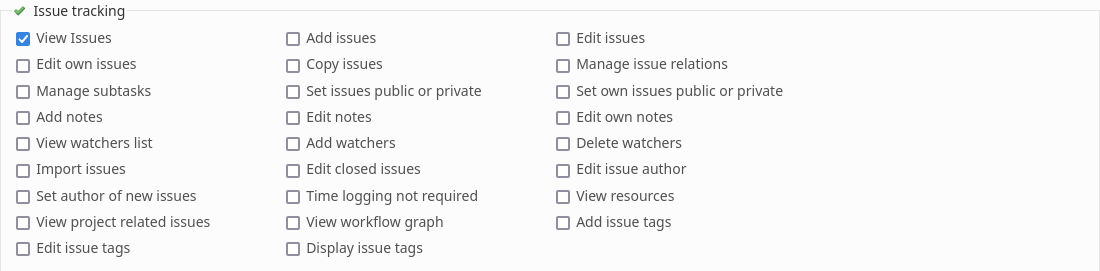
The revision of the role Non-member takes place in the administration area (Roles and permissions). Open the mentioned role there and revise the permissions accordingly, that only contents may be read (not changed).
Example for permission to the project:

Example for permission to issues:
Example for permission to wiki pages:

Own rights to view files related to a ticket or a wiki page are not necessary.
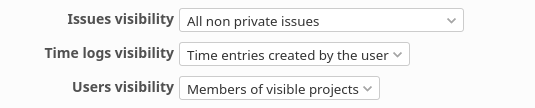
To note
We would like to point out that you should not forget the settings in the header of a role regarding the visibility of tickets, time bookings (if active) and other users. The following settings are recommended for our case described here:
Step 3: Create public project
Now the publicly accessible project is created. For this purpose, the link New project is called up via the project list and the corresponding settings are carried out.
Step 4: Other activities
After the project is created, you need to assign members from your team who are responsible for creating or editing the content.
These team members are visible to non-members. However, since this is an employee-customer relationship, this is usually fine. The activities described here only apply to the modules: Issues, Wiki
If other functions are used / provided in a public project, the configurations and role permissions are to be revised accordingly by you. Always with the goal to allow the users read-only permissions (view).
Step 5: Customize the dashboard
A non-mandatory step is to create a custom dashboard for the public project. There you can, for example, remove or customize the default blocks. As well as design the content yourself using the available dashboard blocks.
 Caution: Changes to the dashboard or a new dashboard should only be created by users who are knowledgeable so that the system-wide dashboard settings are not overwritten.
Important: The new dashboard must only be used for the current project. It must not be a System default. Otherwise the dashboard blocks in all other projects will be overwritten and replaced with this one, which is NOT desired in most cases. Be careful with such changes to the default settings, they are not easily recoverable!
In our online demo you can test the settings. There is also the additionals plugin installed, so you can try out the dashboard function.