A workflow in the project management tool Redmine is a process that defines the steps a ticket has to go through from creation to completion.
Every company has different workflows. For many, it is important to use their own workflow (even though the Redmine default workflow would be suitable for most use cases).
Tip: Keep data structure (projects, roles, trackers) minimal (KISS principle). This simplifies the application and increases flexibility.
Since Redmine is quite flexible to use, workflow customization is usually not a problem. From relatively simple (To -> In Progress -> Done) to very extensive, you can put together your own workflow as you like.
Necessary for this are the two areas in the administration menu:
Issue statuses: Here, the necessary status information is created, which a ticket will later have to pass through individually. These must then be integrated into the workflow for the individual Trackers.
Workflow: For the existing ticket status information, you build the workflows for your tickets in the Workflow / Status transitions section. This is done per role and tracker.
Especially users who are new to Redmine will have a hard time selecting the permissions. And if the workflow to be defined is also quite extensive, you do yourself no favors to work through a text-heavy view.
We have made the experience that the visualization of data for the planned workflow simplifies the process immensely. So that you don’t have to use an external tool for this, we implemented a workflow visualization with the help of the Redmine Reporting Plugin (available from v3.0.2).
This is directly below the workflow configuration or below tracker management.
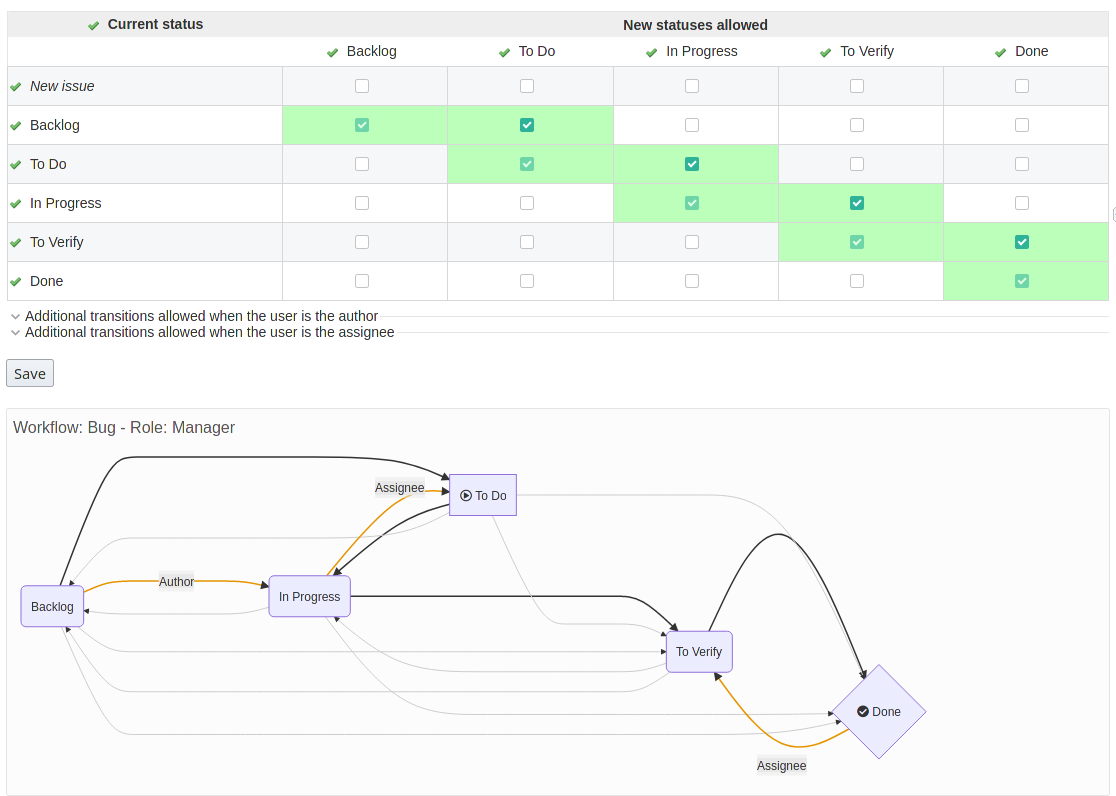
 Example: Workflow visualisation of the workflow configuration (Redmine Administration area)
Advantages of workflow visualization
The visualization ensures that the individual steps (statuses) that an issue with a corresponding tracker has to go through by a user of the corresponding role also work as planned. You can see visually by the use of arrows, symbols and colors immediately:
- whether all statuses are included (or one has been forgotten).
- at which status it starts (start symbol) or stops (end symbol)
- if it is possible to skip a status
- whether it is possible to process a issue in one direction only
- if it is possible to reopen a closed issue
- whether other roles are allowed to use the workflow differently (gray lines)
- Whether there are exceptions for author or assignee (colored lines).
Useful for
- Users who are new to Redmine (e.g. former Jira users) and need support with workflow configuration.
- Users who need to work out complex workflows and need an overview.
- Users who are supposed to work with the (for them) new workflow and are unsure which status will follow next.
Here you can find the workflow graph
The graphical visualization of the ticket workflow in Redmine is implemented in the following areas:
Administration area: Here you can find the visualization in the Tracker section and in the Workflow section, namely when you want to edit the respective entries.
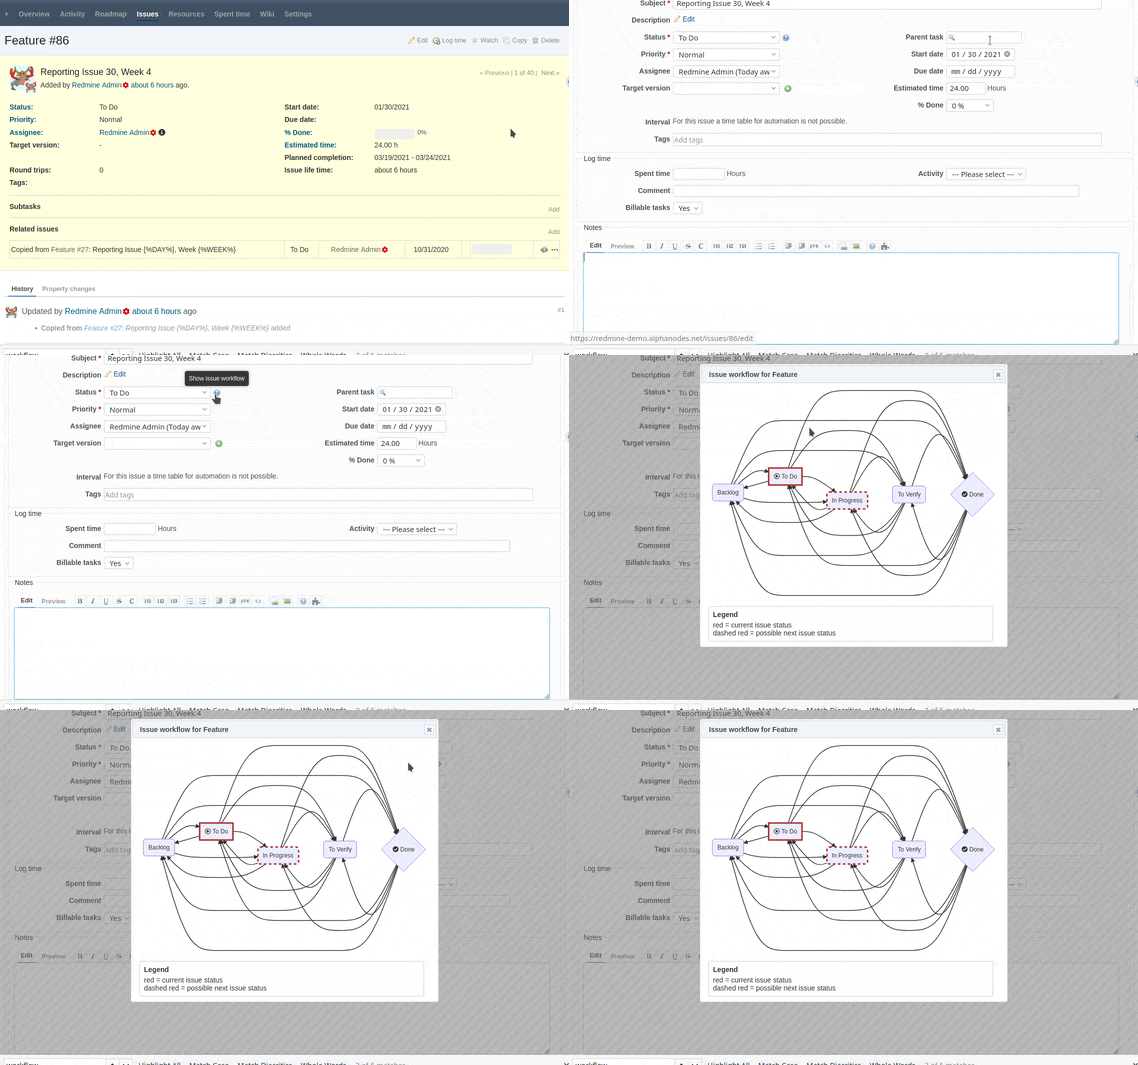
Issue edit mode: For users with the corresponding permission, the visualization is available in the Edit mode of the issue view. In this case, an icon will be displayed next to the Status selection.

Tip: By the way, users not only see the current ticket status in their workflow diagram, but also the next, possible status for ticket further processing.
How to activate the workflow visualization
In order to use the Workflow Graph, it must be activated by a user with administrator rights.
- Plugin configuration: Under Plugins / Redmine Reporting / General, the option Enable Workflow Graph must be activated in the Issues section in order to display the Workflow Graph in Tracker Management, Workflow Management and in issue editing.
- Roles and permissions: Here, the item Display Workflow Graphs must be activated for the respective role.
Conclusion
The workflow visualization helps in any case not only in the creation of a planned workflow, but also to better understand and analyze complex processes. You can see at a glance how extensive the workflow is, whether the planned process makes sense or needs to be revised at certain points.
All information about our extensions for Redmine is available on the product page. The paid reporting plugin is available individually or in a bundle with additional features. The functionality can be tested extensively in our online demo.
