
Many companies use their Redmine project as a central point of contact for internal developers, external freelancers, customers, and suppliers. They all have different roles, permissions, and, of course, working hours. The Redmine HRM plugin for Redmine v6x offers an elegant solution for clearly separating external and internal team members with its user types. This provides a better overview of project teams with external members, customers, and internal members.
What are HRM user types?
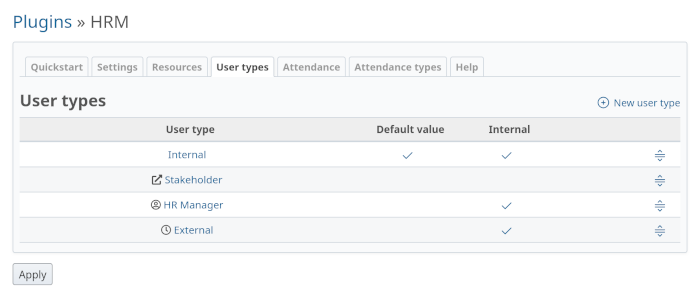
User types are project-independent categories that you can use to classify each Redmine user. Instead of treating all team members the same, you can define different types such as “Internal,” “External,” “Customer,” or “Supplier” — and even more granular types such as ‘Developer’ or “Human Resources.”
The special feature of user types: Regardless of role permissions—which apply on a project-by-project basis—user types have specific HRM permissions, work calendars, and even individual menu items. This ensures that everyone has exactly the functions and information they need for their work.
Practical advantages for your everyday work
These granular HRM permissions offer many practical advantages for mixed teams:
Better resource planning: You can see at a glance which internal employees are available and which external staff you can use. The evaluations can be filtered by user type—perfect for capacity planning.

Flexible authorization management: Customers only get access to specific project areas that are necessary for their user type. Internal employees, on the other hand, can use all HRM functions. External freelancers, on the other hand, are given customized functions in accordance with their contractual arrangements.
Automated assignments: New team members are automatically assigned the default user type. This saves time and prevents errors during manual configuration.
Data protection through anonymization: A particularly interesting feature of the HRM plugin is the anonymization of activities. When this is activated, users only see their own entries in the activity log—other activities are displayed anonymously. However, you can exclude certain roles (e.g., data protection officers) from this anonymization by user type. This is particularly relevant for universities, government agencies, or companies with strict data protection guidelines or sensitive compliance requirements.
Avoid authorization chaos
Flexibility comes at a price: the initial configuration requires careful planning. You need to define in advance which user types you need and what rights they should be given.
Maintenance can also be time-consuming: if you subsequently change an internal user type to external, the users affected will lose their work schedules. You should therefore think carefully about such changes.
Our tip: Start small. Two, maximum three user types (e.g., internal, external, stakeholder). Only expand when you have specific problems that can only be solved by adding more types. Not the other way around.
Target groups and use cases
Ideal for project managers and team leaders in larger companies with mixed teams (50+ people) or complex structures and strict compliance requirements. The feature is particularly valuable for IT service providers, consulting firms, agencies, and universities.
Specific example: You are managing a software project with 5 internal developers, 2 external UI designers, and a customer representative who wants to view the status. A work schedule is only necessary for resource planning for the developers and designers.
With user types, you set up:
- Developer-Internal: User type name “Internal,” activate “Internal” option (necessary for work schedule assignment/resource planning -> e.g., 40-hour work week). HRM permissions: Display supervisors, display groups.
- External designer: User type name “External”. Activate “Internal” option (necessary for working time calendar assignment / resource planning -> e.g., 20-hour working week), attendance booking required. No HRM authorization (only see own attendance).
- Customer: User type label “Stakeholder.” No HRM authorization, not marked as “Internal,” special menu items, e.g., for project reports (own dashboards).
Tip: As a default setting, we recommend selecting the user type that occurs most frequently in the system. This will be automatically assigned to new users - in most Redmine installations, these are internal employees. Other user types must then be manually assigned to the respective users.
This allows you to keep track of capacities while taking different working hours (40 hours vs. 20 hours) into account in resource planning, while everyone gets the right tools and necessary insights (special menu items). The “Attendance booking required” option for external users also makes a clear difference in terms of better control.
The above example can be expanded, e.g., to include an administrative role:
- “HR Manager”: User type name “Human Resources,” activate the “Internal” option. HRM permissions: Display HRM, display attendance, display supervisors, display groups, display admin/user type, manage users, manage groups, manage work time calendars, manage holidays.
Useful Downloads
Expand your knowledge of Redmine and our plugins with our collection of cheat sheets, guides, infographics, checklists, and more.
Conclusion: Structure creates efficiency
HRM user types bring order to complex team structures. Investing in configuration pays off in terms of improved clarity and targeted authorizations. However, you should plan the types carefully from the outset, as subsequent adjustments can be problematic.
Curious? Try out the HRM features in an online demo or inquire about the possibilities for your team. User types are just one of many features that can take your project management to the next level.
Learn more about our Redmine HRM Plugin. The functionality can also be tested in our online demo.