Redmine is a great open source project management tool for companies of all scales. But working with it the first time you may find yourself daunted. This tutorial helps you to get started in organizing your first project, when using a Redmine application, managed by AlphaNodes.
Note that for this user guide we used the Redmine version 5.0.x and the AlphaNodes Redmine Plugin Enterprise+ Bundle. So you might see some features in our guide, that are probably not part of your standard Redmine installation in case you are not an AlphaNodes Redmine Managed Application Hosting customer.
Getting started with Redmine
Once you have logged in with your user account you are good to go. Redmine environments setup by AlphaNodes are usually designed in the Coroporate Identity of the customer. So the screenshots here may look a bit different to your Redmine system. But the functions and positions where to find everything are basically the same. To make things easier for you we will cover only the basic functions you need to do in order to create your first Redmine project.
Redmine applications, provided by AlphaNodes are basically pre-configured. So you could start right away. But we recommend you to do the following checkups before you start inviting users into your new Redmine project management tool.
Check your Settings
Go to the administration area and check on the settings (/settings). Here you setup your basic Redmine configuration regarding Authentication, Projects, Users, Issue tracking, Time tracking, Files, global eMail notificiations, handling of incoming emails and Repositories.
Manage roles and permissions
Afterwards take a look at your Roles and permission section (/roles). Roles are used to define user access and visibility for your project. Here you define what features your users may be able to use and work with according to their position in your company and according to the job they need to do when working in Redmine.
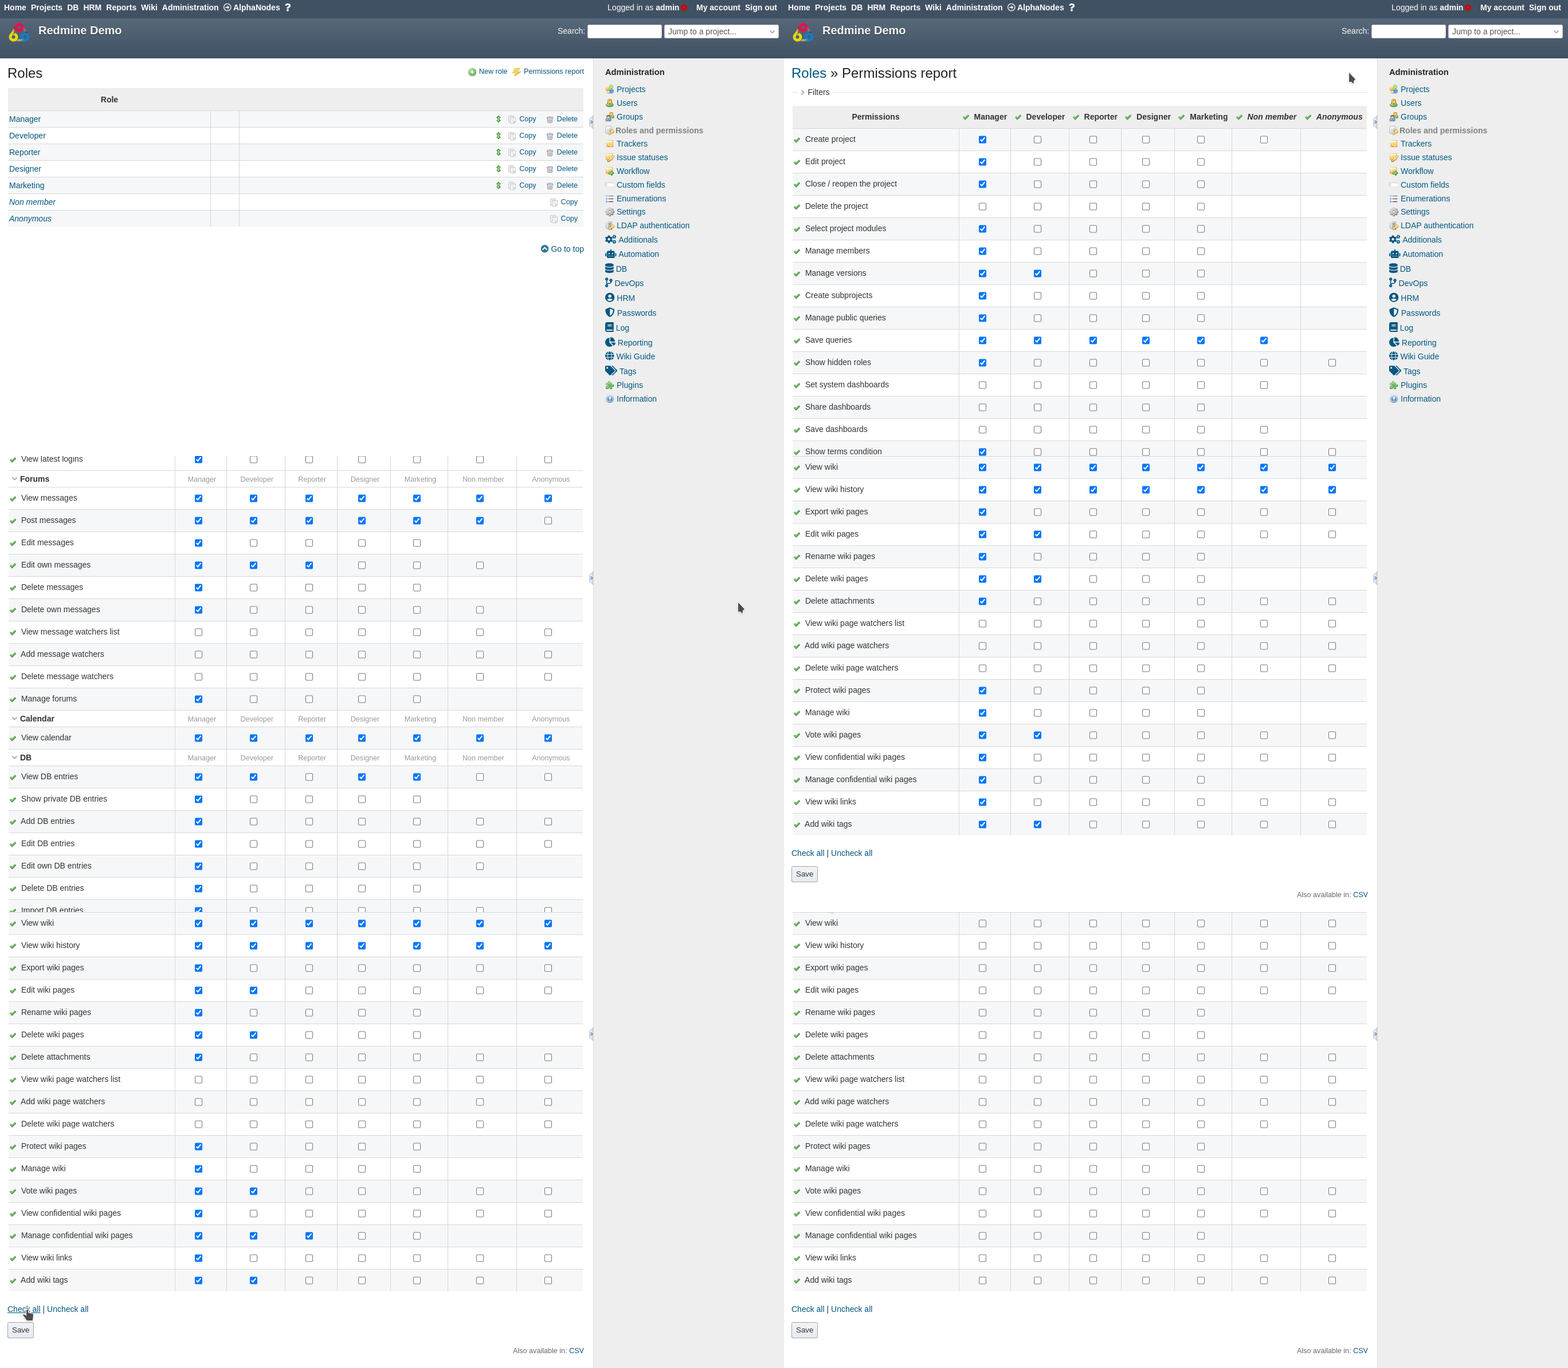
Define Trackers, Issue statuses, Workflows
The next station should be the section trackers (/trackers), issue statuses (/issues_statuses) and workflows (/workflows). Those three areas are important for your task handling. Take a look at the basic settings and adjust them (if necessary) to the needs of your company goals.
Create user accounts
When the basic settings are done you can start creating user accounts for your team to be able to work in Redmine. There are various options to create new accounts.
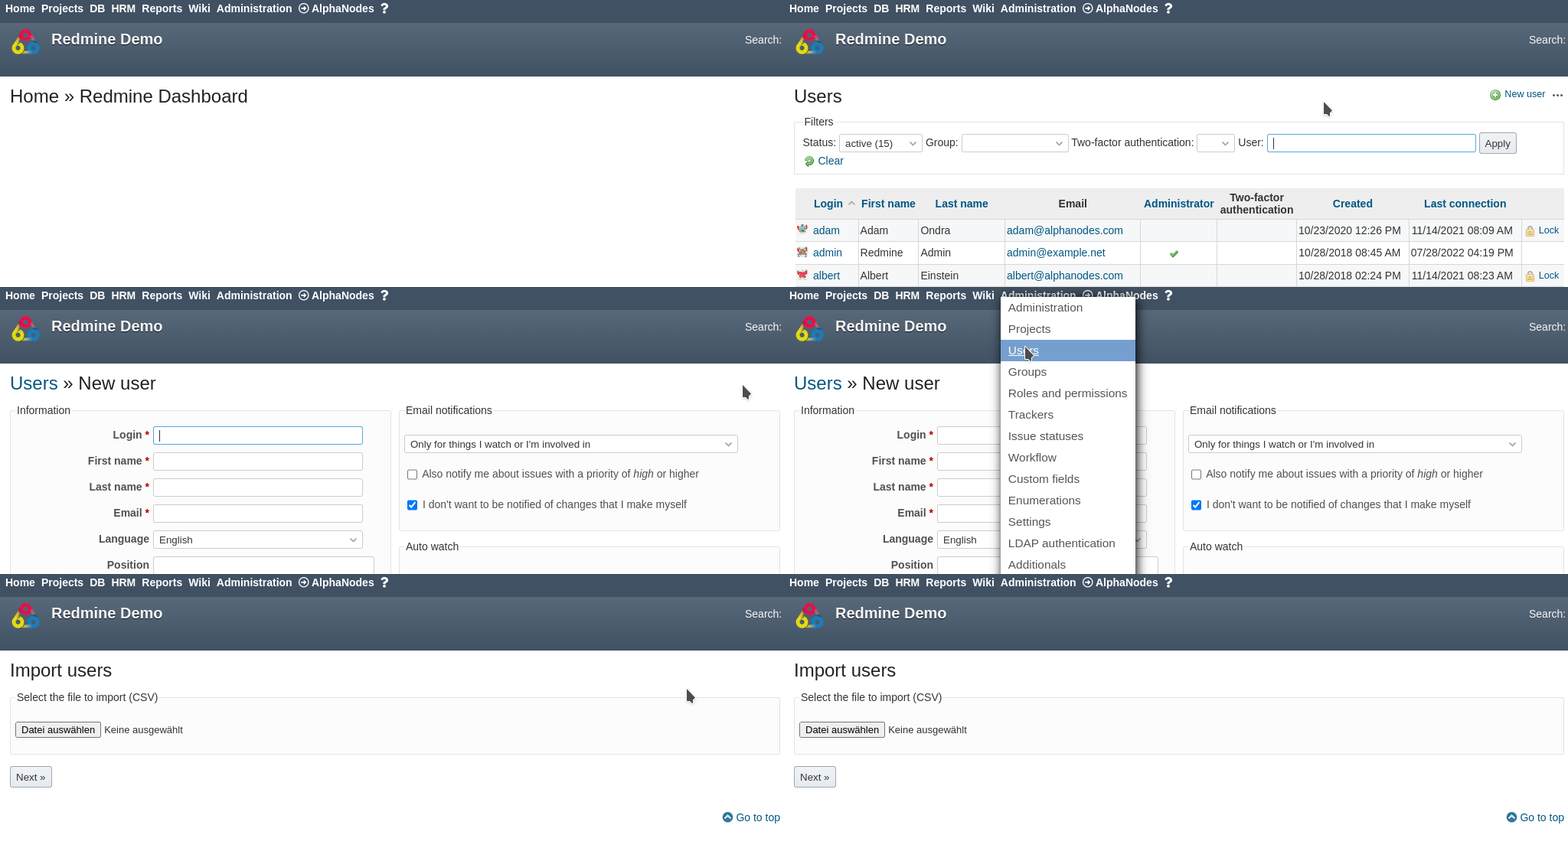
- you can create them manually
- you can import them via CSV
- you can use the API
- you can allow Self-registration
Tipp: When working with the AlphaNodes HRM Plugin you are able to manage and create user accounts even without administration access. This is an important function when this task is performed by users from the HR department, who usually do not need access to the system configuration for security reasons.
Redmine comes with Two-Factor Authentication (2FA) out-of-the box. This means you can add an extra level of protection to user accounts if you need to.
Creating your first project
Redmine is coming with so many basic functions. You will be amazed what you are able to achieve, when working with this great tool. And the best part is: there are usually no restrictions regarding number of users, projects or issues if you choose to host Redmine with us.
Before you are able to use all those great features you need to create your first project. Projects are a home for your team in order to track and organize issues in a business category. To do so go to the Top menu named Projects and click the New project link.
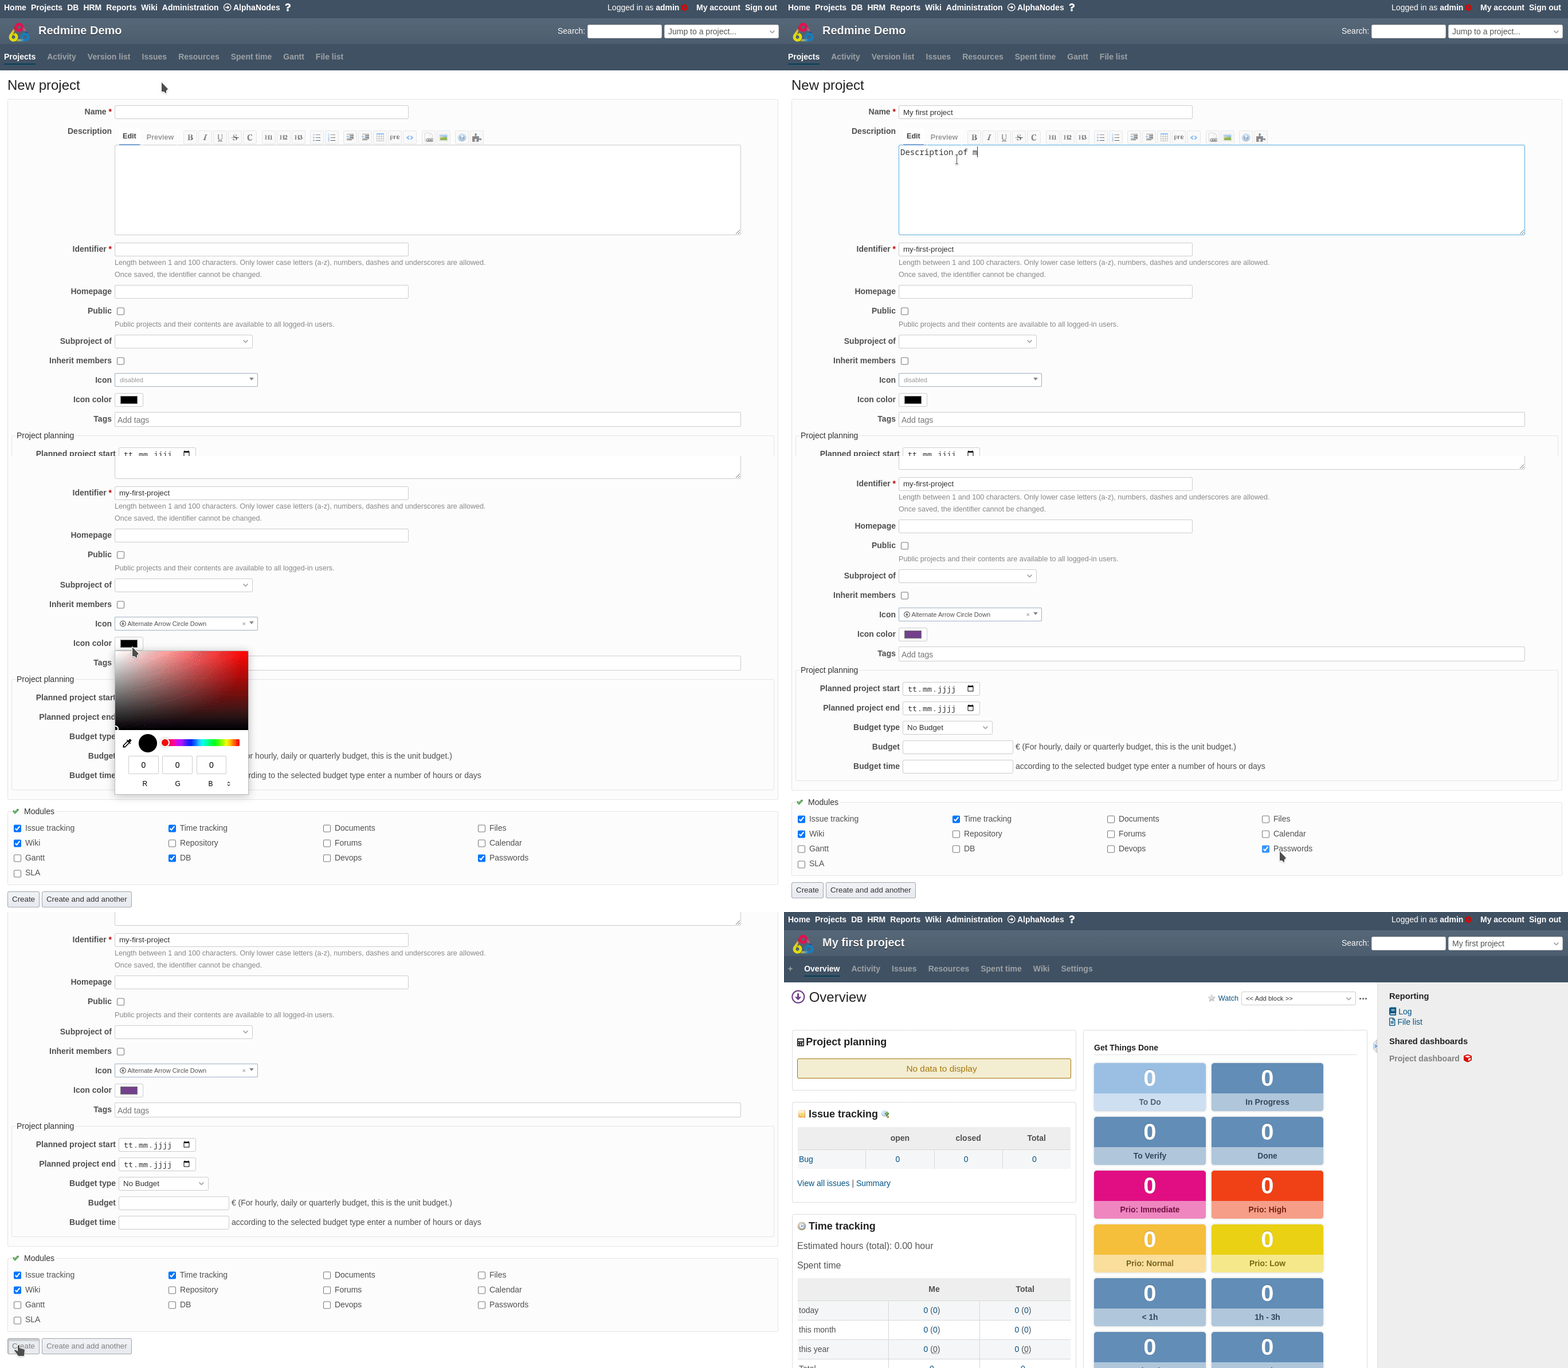
Tipp: For the beginning it’s probably best to start very simple and just create your new project with basic functionality. In our example we activate only the following modules:
- Issue tracking: To allow project members to create task they will be working on.
- Time tracking: To allow project members to save spent time on issues they were working on.
- Wiki: To provide project members a central place where all project relevant information is stored.
Visibility and privacy: Ensure project visibility is NOT set to “Public”. Otherwise newly registered users will be able to access sensible project data, that is not meant for them. If you want to make a project only viewable by project members don’t set it to public.
Adding team mates (project members) and remove them
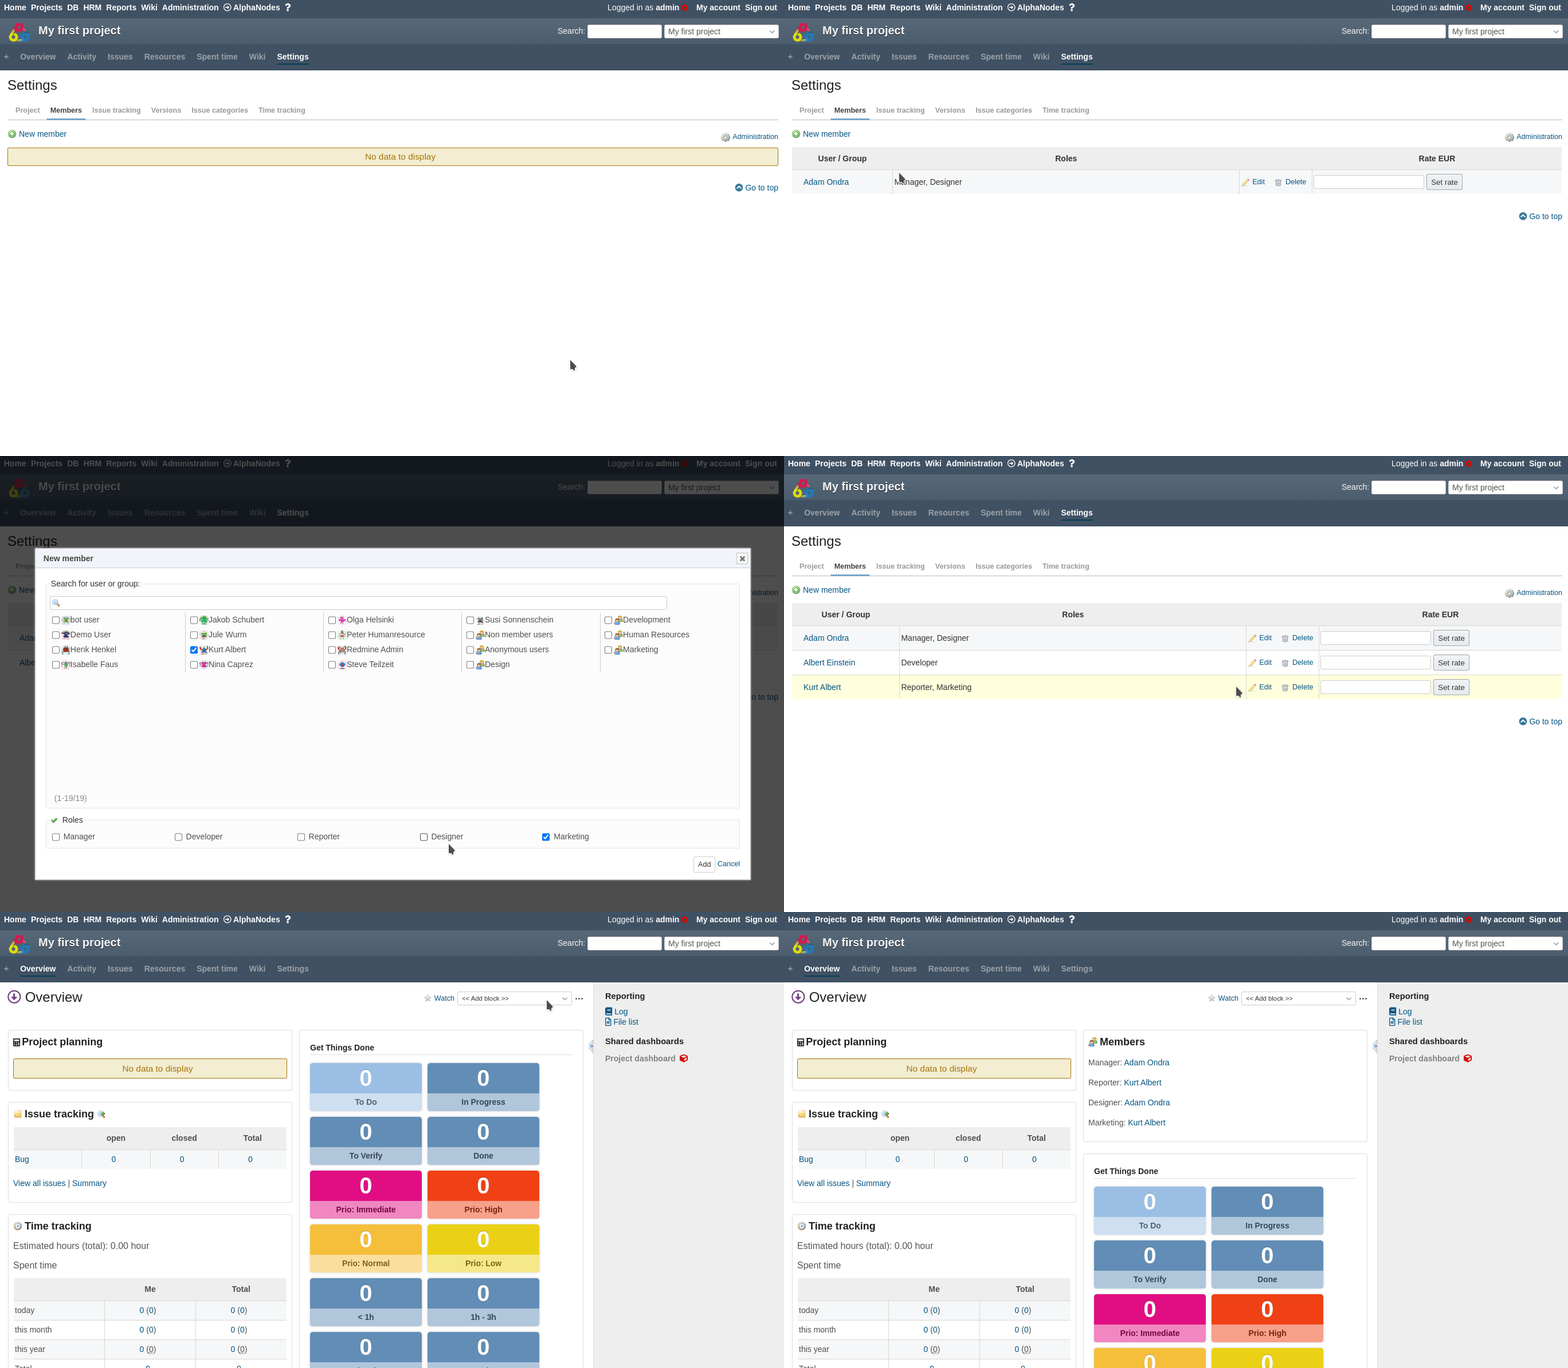
Next up, we want to add members to the new project so you are able to assign your teammates issues, they will be working on. That’s pretty easy as you have already created user accounts in the first step.
- You can now add those users to this project by opening the Settings section Members.
- There you simply add a New member to the project and assign this member to a role.
- It is also possible to edit an already assigned project member or to remove it from the team, if the user is no longer part of your project.
Create your first task
Well, you are almost done with your first steps as project manager in Redmine. What’s left to do is to create tasks and assign them to your team.
- In order to create a task within a project open the Issues section of the project App-menu and click on the New issues link.
- The issue edit mask opens up and you can fill out all the relevant information for your task. What kind of task trackers are available within the project depends on the project settings in the area Issue tracking / Trackers.
- In our example we choose to create an issue with the tracker Feature and assign it to one of the assigned project members.
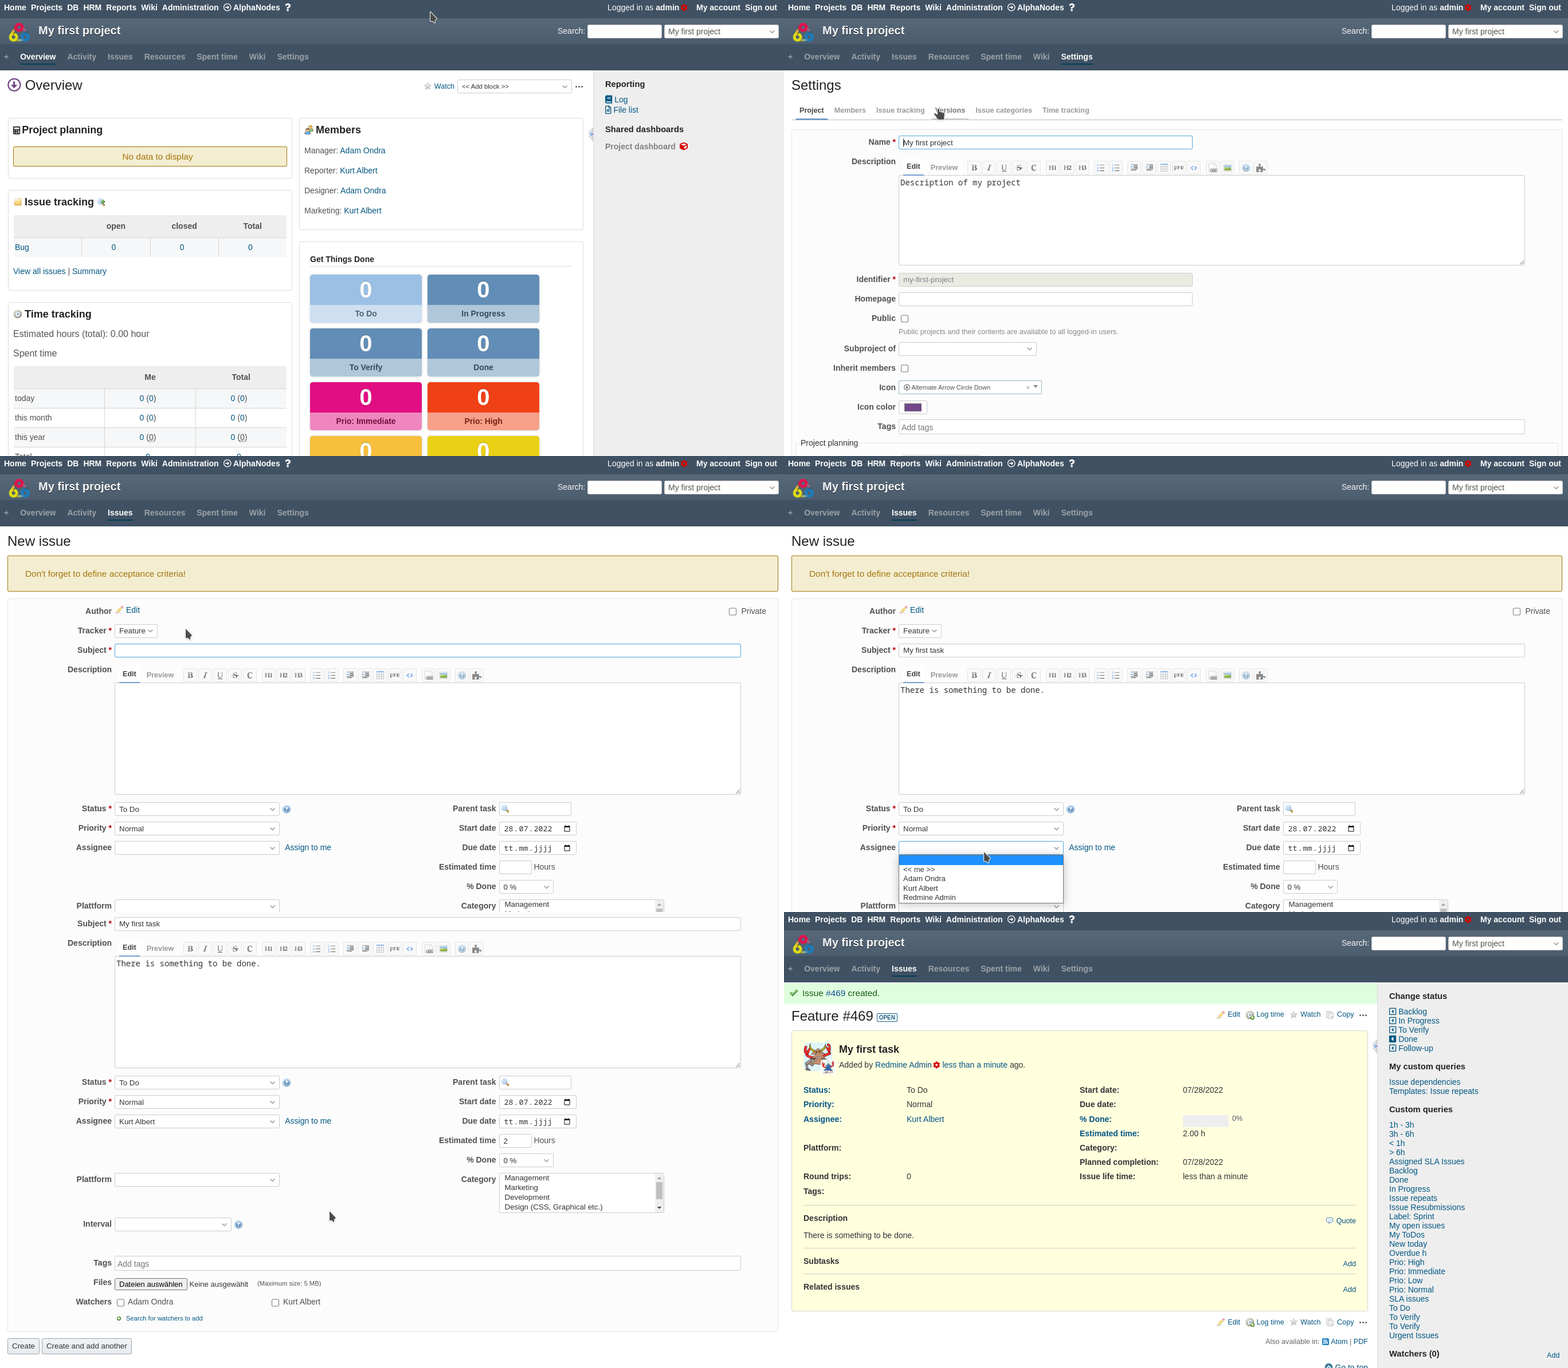
The cool thing about Redmine issues is that you have a lot of issue information available by default. Next to the basic information like:
- Subject
- Description
- Status
- Priority
- Assignee
You can fill out a lot more information relevant to your project task like:
- Parent task
- Start and Due date
- Estimated time
- Done ration
- Issue tags
- Watchers
and individual information based on custom fields for issues.
The Redmine project overview dashboard
Now we have introduced the basics of setting up your first project let’s start looking at the different ways you can view and organize what you are doing. We start with an overview on using the dashboard functionality provided by an AlphaNodes add-on (Additionals Plugin).
The best way to keep track of what’s happening in your project is using a dashboard with the information, relevant to you and your team.
To create and manage a dashboard make sure you have the appropriate user permission in the administration area (/roles/permissions) like:
- Share dashboards
- Save dashboards
To create a project dashboard go to the project overview page and open the Actions menu item New dashboard.
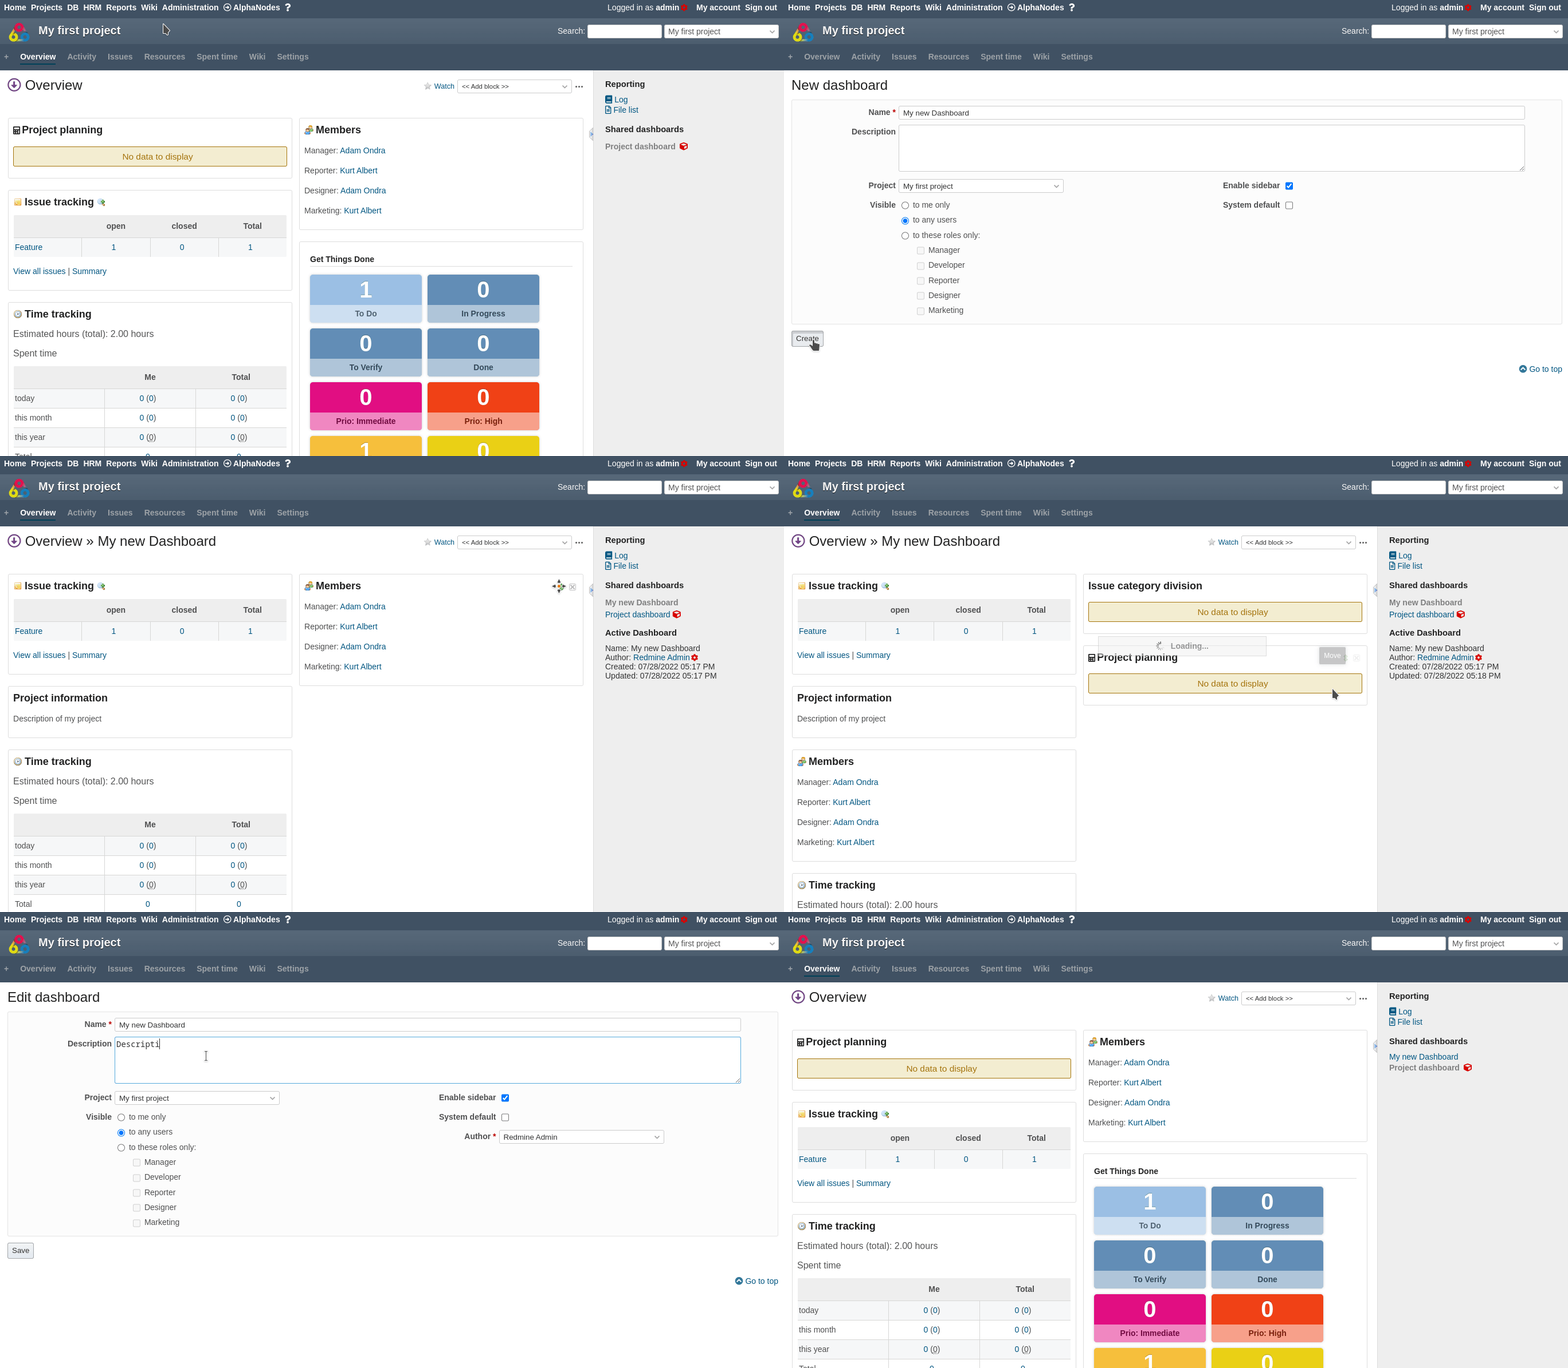
The great thing about the dasbhoard functionality is you can make the information visible to you, to any user or to a specific role. You are able to decide what information is displayed on the project overview dashboard by adding additional dashboard blocks. Those dashboard blocks are easy to move and to remove.
Don’t worry about what information is available to your team members. Your project team will only see those information made available to them depending on the set user role and permission.
Tipp: Learn more about creating a Redmine Dashboard for project management in our blog post.
How to add project charts
Now you know where to find the dashboard and how to handle dashboard blocks you can unlock the real power of your Redmine hosted by AlphaNodes. Simply by using the available project charts and evaluations made available by an AlphaNodes add-on (Reporting Plugin).
Those graphical representations of your tasks will help you see what’s going on in your project and when to make adjustments.
To add charts to your project overview dashboard go to the Add block section of your dashboard and choose one of the available charts.
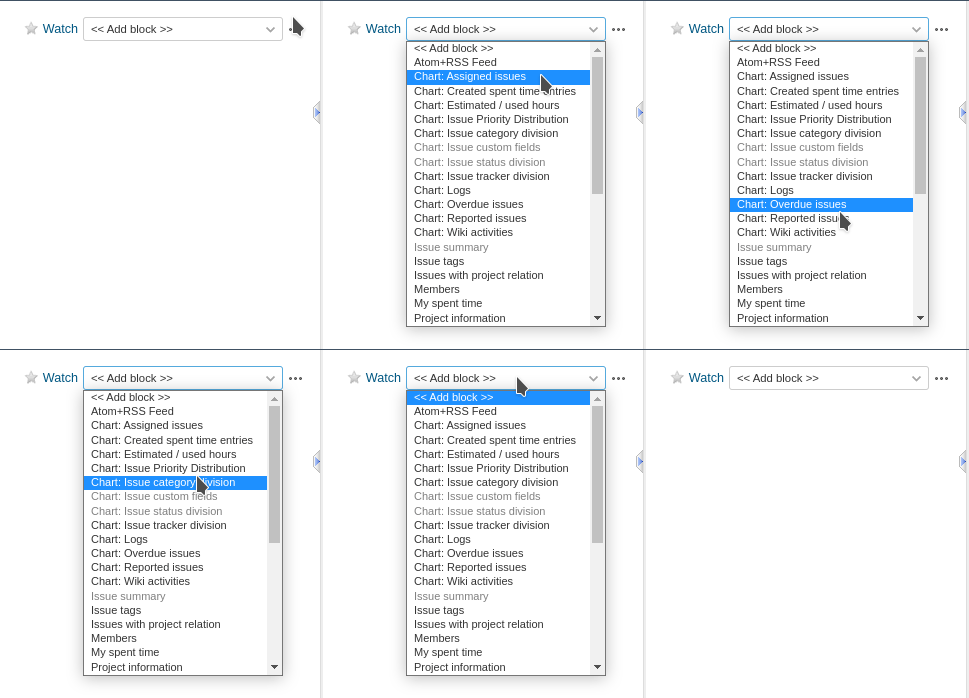
Tipp: Learn more about all available Reporting Plugin charts and evaluation in our chart guide for Redmine Reporting. We also recommend to take a look at the counterbox chart and how to use it in order to Get things done in your Redmine projects.
Live Search for projects and issues
You can imagine that a lot of data will accumulate over time. The more projects you have and the more issues you have, the more important it is to have an effective way to access relevant information quickly. The Reporting Plugin’s Live Search helps you quickly locate projects and issues.
To browse the projects open the project list (/projects). The search is located in the upper area.
To browse the issue list, open the Issues area (/issues). There, the search field is also located in the upper area.
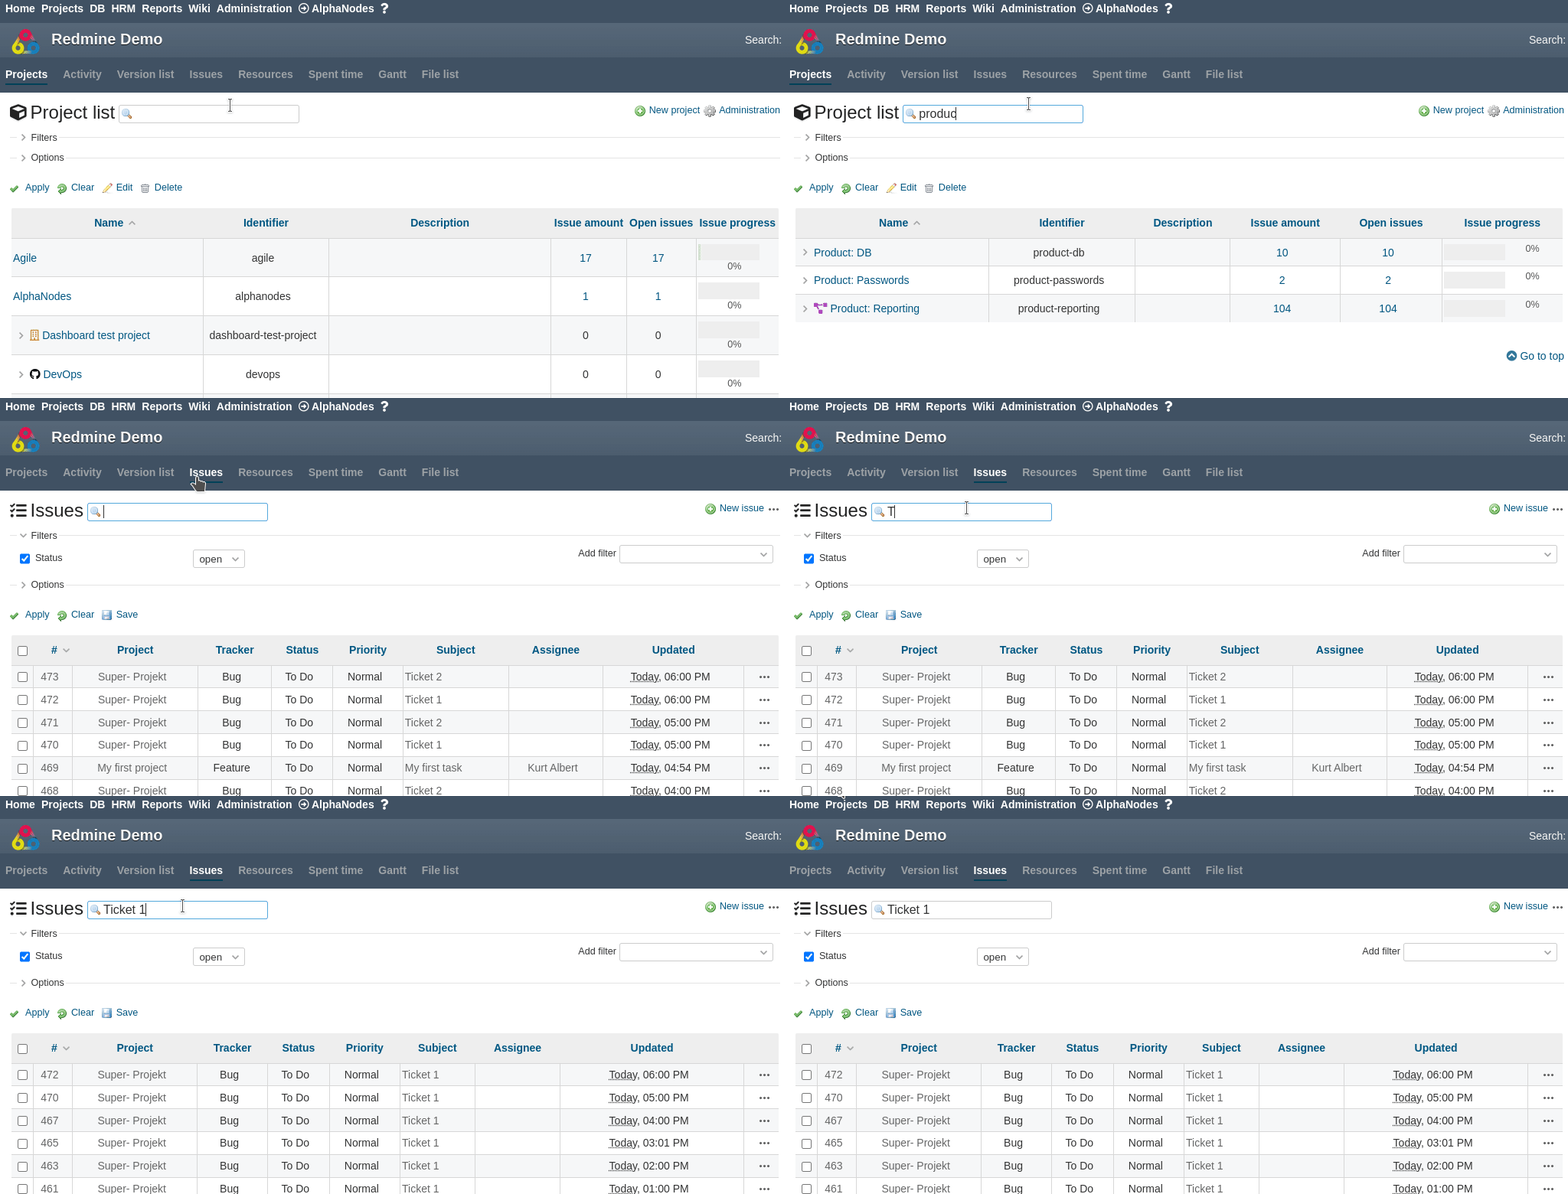
Tipp: The Reporting plugin comes with a lot of features in order to improve project management and usability in Redmine. The basic plugin configuration takes place in the administration area Plugins (/plugin/redmine_reporting).
Conclusion
These are the first steps to get started with Redmine. In our opinion, the best project management tool in the open source field, which provides so many functions out-of-the-box. Due to the feature set, getting started is not always easy and comes with a steep learning curve. Check out our available information in the blog and on the website. Our free Redmine online demo gives you a first look at the functionality of a current Redmine environment hosted by AlphaNodes.
If you are looking for further functionality, we do also offer additional plugins, that extend the basic Redmine system with function like:
- Taskboard and Burndown charts for agile teams (see Reporting Plugin)
- Budget management and hourly rate management (see Reporting Plugin)
- Issue SLA based on issue priority (see Reporting Plugin)
- Automating workflows and other entities in Redmine (see Automation Plugin)
- Manage attendances and absences of your team as well as user ressources for upcoming projects (see HRM Plugin)
- manage digital information related to projects (see DB Plugin)
- manage sensible information and project related passwords (see Passwords Plugin)
- setup a knowledge base on base of the Redmine standard wiki (see WikiGuide Plugin)
- integrate third party tools like GitHub or GitLab you should take a look at our DevOps Plugin
In any case our free tools Additionals (for Dashboard implementation) and Additional Tags for tagging Issues and Wiki pages is already a good extension for every Redmine standard installation in version 5.0x or higher.
Redmine - Open Source Project Management Software
Redmine is a free, web-based project management software that provides project teams of all kinds with extensive functions. In addition to user and project management, users have access to discussion forums, wikis and task management. Redmine is a good alternative to commercial applications. Because companies can scale more cost-effectively and are not tied to specific vendors or limited user licences. If you want to learn more about Redmine, you can find extensive information at “redmine.org”.
Redmine can be used in one of two ways:
- either self-managed, where you install Redmine yourself and self-host your instance of the free available Community Edition.
- Or by using our Managed Application hosting service for Redmine, which comes as a paid Software as a Service (SaaS) model.
Our commercial cloud hosting service offers the benefit of no maintenance or infrastructure costs and regular automatic updates without any manual work. We are located in the EU (Germany) and hosting takes place in accordance with GDPR. The plugins mentioned in this article are part of our Redmine Managed Hosting. You can use them for free during time of hosting with us.
